Showing posts with label Microsoft. Show all posts

Thursday, 24 January 2013

How to Delete an OS by MSCONFIG?


http://www.munnamark.blogspot.com/2013/01/delete-extra-OS.html
How to delete an operating system


It was at the end of 2011 when Windows 8 was released for the first time as developer preview version. I installed it on my PC with Windows 7 side by side. Most of the people didn't like it. But I was very impressed just after using it for few hours. 

Then I decided to remove Windows 7 to continue with Windows 8. Windows 7 was installed on Drive C and Windows 8 was on D. To delete Windows 7 I booted from Windows 8. And tried to format C Drive. 

But drive C was not formatted! Because Windows files were very much protected. They can't be formatted until you re-install your windows. What should you do now? How will you remove the OS that you don't wanna use? 

Let's find how to solve this problem. 
  1. Open System Configuration. (Hint: Start + R > msconfig > enter
  2. Select the Boot Tab.
  3. Choose the Operating System you wanna remove. 
  4. Now hit the Delete button. 
  5. Open My Computer. Format the drive where removed Operating System was installed. That's it. 

Don't try to remove the OS on which your PC is currently running! I mean if you wanna remove Windows 7 then start PC by Windows 8. Because you can't cut the tree on which you're climbing! :)
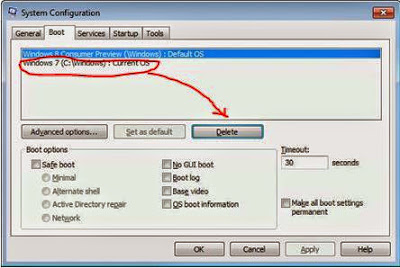

How to delete an OS by msconfig


Visit Marks PC Solution to see the original post.


Thursday, 27 December 2012

Get Weather Forecast by Windows 8 Weather App!


If you're a regular visitor of this site then you might know that several posts have been made about Windows 8. Several times I mentioned about Weather Forecast app of Windows 8. 
Previously I wrote about Windows Reader. Today I will try to give you a detailed information about Weather app. 

This app is named as Weather or Bing Weather. And specially made for Windows 8. And it is not readily available for Download. It is bundled with Windows 8. 

If you're connected to online you can view the world weather through this weather app. It collects information from the server and shows you updates. You can get 10 days weather forecast with historical data. You can also search your desired location and get information of it. 


How to use it? 
This app is very handy to use and easy to navigate. To use this app press the Start Button and click on weather app tile. Immediately it will run full screen. 
  • To find a particular city- Click right button of your mouse and then hit on places button from the top. Then hit on + button and type the name of the city and choose it from the list. 
  • To see the world weather- Click right button of mouse and choose World Weather. Then click on your desired location in the map and get the necessary information.
  • You can also view the historical data, hourly forecast and 10 days forecast of a particular location by this app.

10 Exceptional Features of Windows 8

Sunday, 9 December 2012

10 Exceptional Features of Windows 8- Upgrade to Enjoy!


I've already written more than 3 posts about Windows 8. But all of these were related to preview versions. And I'm writing this post just after installing the Final Version in my PC. 
  1. Built in Security for your overall PC protection! 
  2. Built in Reader to view your PDF and XPS files! 
  3. Live tiles that let you know the latest weather forecast, news updates, sports updates and so many.
  4. Touch friendly and drag and drop interface that eases the use of mouse. Don't be afraid. You can also use the keyboard shortcuts for Windows. 
  5. Efficient use of hardware.
  6. Task Manager with new useful features. (Shift+Ctrl+Esc)
  7. New apps for view image and video, using camera.
  8. New apps for Mail, Messaging and connect with people. You can also integrate your Facebook account with Windows Mail. 
  9. Great way of multitasking. Quickly switch between the apps. Press Alt+Tab or just move your mouse at the top left corner of the screen to switch the app. 
  10. New Start Screen! That irritates many users. This is the most important visual change of Windows 8. But if you use this for a week, you will enjoy this. This new start screen will be useful for searching apps, files and settings too. Just press the Start Button and type your query. Immediately you will get the result! 

Facing problem to view My Computer Icon on Desktop? Click here


Activate Final Version of Windows 8 (All Versions)

Dot Net Framework 3.5 Not Installing on Windows 8? Fix it Now!


You may face a common problem while using Windows 8. Microsoft .Net Framework 3.5 is not installed with Windows 8. And several programs may ask you install this. And you can't install this from your PC. It will ask you to connect to the net and use Windows Update. 

By default Windows 8 comes with .Net Framework 4.5 and it doesn't include 3.5. When you try to install .Net 3.5 that you previously downloaded from web the you will see the following message. 


And you will get the same message while installing some some programs that is developed using .Net 3.5 platform. And you will not able to run those programs on your PC! This is a very bad job by Microsoft. A great trouble for Windows 8 users. 

But today you will get the solution. You've install this using command line. I mean you have to use Command Prompt. And surprisingly you Windows 8 DVD includes the .Net Framework 3.5! 

Now start the work:
  1. Enter your Windows 8 installation disk on DVD Drive.
  2. Now run Command Prompt as Administrator. (Hint: Press Start > Type cmd > Now right click on Command Prompt and hit on Run as Administrator from the bottom)
  3. Now copy the following command and paste it in the command prompt window. Or type the following line in command prompt. Press Enter (To paste the command in command prompt, click the right button of mouse and select paste)
  4. Now .Net Framework will be installed within few minutes. 
DISM /Online /Enable-Feature /FeatureName:NetFx3 /All /LimitAccess /Source:h:\sources\sxs


Remember: h is the drive letter of DVD drive. Change it with your DVD drive letter. 

Don't forget to share this troubleshooting tips with your friends.

Activate Windows 8 Just by Double Click (All Versions)


Couple of weeks ago the final version of Windows 8 has been launched by Microsoft. Versions are- 
  • Windows 8
  • Windows 8 Pro
  • Windows 8 Enterprise
These are the main versions which have other segments too. ie. Pro N, Pro VL, Enterprise N, Enterprise VL etc. 

If you've any trouble to activate Windows 8 you can solve it just by double click. Have any doubt? Try it now! 

Whatever the version of your Windows 8, a single activator can activate any all versions. Follow the steps below:
  1. Download the zipped file from the link below.
  2. Now extract the file. (It can also work in zipped condition)
  3. Then double click on the file Windows 8 Activator.exe. 
  4. Now within 2/3 seconds your PC will be restarted.
  5. After restarting you will get some message about activation. Hit OK button in the all boxes that appear. 
  6. Enjoy the benefit of full version. 

Download Link


If you can successfully perform this task, then your Windows activation status will be as image shows below:


Also read these posts if you face any problem with these issues:

How to create Password Reset Disk for Windows XP


Anytime you may forget your password. Or someone who knows your password may change it to challenge you! 
That’s why Windows XP has a system to create a reset disk for forgotten password. No matter how many times the password has been changed. This disk will allows you to reset the password until you re install Windows XP on your system.

And if you're using Windows 7 or 8 then Read This
And don’t be confused. This reset disk only work with your computer. It will not work in any other system.
To create a reset disk, all you need is just a USB flash drive and your current password (if any).
Let’s start-

  1. To open Control Panel Press Start + R > Type Control > Press Enter
  2. Double click on User Accounts and Choose Administrator
  3. Now select Prevent a forgotten password from the left panel\
  4. Press Next > Next > Type Current Pass (if any) > Next > Next
  5. Finish


Caution: Anyone can change your password using this disk! So, keep it in your safe. 


Create Password Reset Disk for Windows 7 or 8

Create Automatic Screen Shots of Your Tasks with Steps Recorder


Dear readers! Couple of months ago I wrote about how to create screen shot by snipping tool. Snipping tool is an easy way to capture image or screen of any window. 

If you're interested to know more about snipping tool then click here

Snipping tool is a manual tool to capture image. But today I will discuss about Steps Recorder which is an automatic tool to capture image or screen. You can use it for different purposes. Say for example, you can use it to make tutorial of something. When are writing about how to do something then you can use this tool to record the process with your written instructions. 


Steps Recorder is built in with Windows 8. But it was also available in Windows 7 named Problem Steps Recorder. Only the name of this app has been changed everything remain same. 

To start and use the recorder follow the instructions below:
  1. Windows 8 users, Press Start and simply type Steps then choose the Steps Recorder. And windows 7 users Press Start + R > type psr > Press Enter.
  2. Now it is active. To start the record press Start record. (Shortcut key- Alt + A)
  3. Now do your normal job that will be recorded. 
  4. Remember, when you click on something it will be recorded. And you will see a red button with every record.
  5. Anytime you can pause or resume the recorder.
  6. Once your task finished stop the recorder. (Alt+O)
  7. When save box appeared press the Save button. (Alt+V)
  8. Give a name to the file. The file will be saved with .zip extension.
  9. When you open the saved file, it will opened with your browser. 
And while using this app, you may find many useful tricks. Don't forget to share your ideas with us. Comment below! 


Stay with Marks PC Solution to get more interesting IT topics!

Monday, 29 October 2012

Hidden Option Can't be Unchecked? Fix it Now!


If you look at the above picture, you'll notice the property of a hidden file. And carefully look at the attributes. The option Hidden is checked. And you will not be able to uncheck this. Because this option is disabled. 

In this situation you need to view the files by unchecking the protected operating system files from folder options. Which is very annoying. Because this option reveals many unnecessary files with your required files. 

Today I'm gonna share a cmd command by which you can easily unhide all files and folders from a particular drive. 
  1. Press Windows Logo Key + R.
  2. Type cmd and press Enter and you will see command prompt window.
  3. Now type this command: attrib -s -h K:\*.* /s /d
This will unhide all files and folders of the drive K. Remember K is name of the drive in which you wanna run the operations. If you wanna unhide the folders of any other drive ie. D, then type D instead of K.


To view all hidden files and folders of your PC, follow this instructions: 
Go to My Computer > View > Folder Options > Check Show Hidden Files and Folders > Uncheck Protected Operating System Files. 


Stay with fatemayesmen.blogspot.com  to get more interesting IT topics!

You might also like:

Saturday, 1 September 2012

How to Create Password Reset Disk?


For your computer security you can set start up password. Whenever you turn on PC, Windows ask you to enter password. Then you enter password and get access to the desktop. And all of us know that it is a normal process. 

But, if your forget your password? Then what? 

You might think experts can easily break it and have access to the PC! And as you're not expert so enter the DVD in the drive and start installing Windows again. And you lose all of your files and folders that is stored on installation drive. 

But you can avoid such type of hazard very easily. I don't advise you to write down your pass in the diary or calender. Because this is not safe. Just spend few minutes to create a password reset disk. It's safe and easy. And there is no risk. Follow the steps below: 
  1. First make sure you've connected your USB Flash Drive in the port. You don't need to format the disk. And your files will not be affected. 
  2. Then go to the User Accounts from Control Panel.
  3. Now hit on the Create a password reset disk option from the left panel.
  4. You'll see Forgotten Password Wizard. Click Next.
  5. Select the drive that is to be used as reset disk. Click Next.
  6. Enter the current password if any. Otherwise leave it blank. 
  7. Click next and wait for the processing. Click Next again. Then Finish.
The disk is ready for use. Now open your USB drive and look for a 2 KB file named userkey.psw. This is the file that can help you to reset the password. Don't delete it. 


Now restart your PC and try to access by entering a wrong password. You'll see the Reset Password option. Click on it and type a new password. And from now you can use this password. 

You can change your password as many time as you wish by the same disk. 

Click to enlarge image

Caution: Anyone can change your password if he knows about your reset disk. So make sure that unauthorized person is not familiar with your reset disk. 

NB: This system has been tested on Windows 7 and 8. And it will work only on that PC from where the disk is created.  

Fun Fact: You've to create this disk before forgetting password. After forgetting this password, you can't create this disk. 


Visit Marks PC solution to read the post.


Wednesday, 1 August 2012

How to Install Microsoft Security Essentials on Windows XP?


undefined

Microsoft Security Essentials is the most reliable antivirus ever made. In fact it is a great step by Microsoft Corporation to provide an antivirus to the Windows users at free of cost. Though it is very harmful for the third party security companies. 

Windows 7 users can easily install MSE on their computers. But if you're using Windows XP then you may face problem installing it on your system. To install MSE on Windows XP SP 2 you need some additional files. 

To install MSE on XP SP 2 download the file below. Then install all the three files of the folder. Then install MSE. If your XP is service pack 3 then install only the first file. 


If you use Windows 8 then you don't need any third party security software. Because it has built in security system

To know more about Microsoft Security Essentials click here


Monday, 16 July 2012

Built in PDF Reader in Windows 8 !


PDF or Portable Document Format is a great way to share your documents with your friends or even in online. Earlier I wrote about both PDF Creator and PDF Reader. These third party tools for creating and viewing PDF is also very handy. 

But how do you feel if you don't need to install any PDF Reader/ Viewer on your PC! Windows 8 has built in PDF viewer named Windows Reader. It comes as metro app with Windows 8. And it can also read your XPS documents. 

If you're running Windows 8 and you have no PDF Reader installed on your system then you will see your PDF files look orange color. Actually this is Windows Reader. Just double click to open the file. 

Or press the start button and type reader. Then press enter to open Windows Reader. After opening the reader click on Browse to open your files and folders. And select the PDF file you wanna read. 

When using the reader you may not be able to see any toolbar. Because it is a metro app that runs in full screen. Simply hit the right button of your mouse to see the toolbar. From this bar you can control your reader whether it will show one or two pages. You can also open your files or save the open file and more. Look at the image below:


To close the reader, simply press Alt + F4. Or drag your mouse from top to bottom of the screen. 


Visit Marks PC Solution read the post.


Add a Password on Zipped folder - Windows XP Only


In windows XP, you can protect your files and folders by adding a password. And no software is necessary for this purpose! All you need is just to create a ZIP file and set a password. Let's do it.
  1. First, select the files and folder that needs to be password protected.
  2. Now right click on it and send it to Compressed (zipped) folder. 
  3. Double click on the zipped folder to open it. 
  4. Now click on the file menu and select Add a password.
  5. Type and confirm the password in the Add Password window and hit OK.
  6. From now, whenever someone tries to open this folder, he will be supposed to enter the password to open the file. 
undefined
Click to enlarge image


And sorry to note this system has been removed from Windows 7 and Windows 8. 


Visit Marks PC Solution read the post.


Tuesday, 10 July 2012

How to Make Windows 7 Genuine - Simple & Easy Way


More than 50% computers are running on Windows 7 OS! This is the market leader now. However the Microsoft is going to launch Windows 8 Final Version at the end of the October, 2012

If you're a victim of software piracy and use illegal version of Windows 7 then you may get continuous error message from desktop. And every time when you open your PC a message will tell you to buy a genuine version of windows. Actually this message is very annoying. 

Sometimes you may need to make your OS genuine to install Microsoft Security Essentials. 

In my previous post I wrote about the easiest way to make Windows XP genuine. And in this post I am showing the way to make Windows 7 Genuine! Let's find out how.
  1. Download the Zipped file from here
  2. Now extract the file.
  3. Now double click on Windows 7 Loader.
  4. Then click on install button and restart your PC when asked.
  5. And if you're looking for Advanced Settings then select the Advanced options located at the bottom left corner of the window.

Tips: In Windows Vista, 7 or 8 don't set your Windows Update Setting automatic. It will consume your internet data and not give you a better result actually. To change automatic update go to Properties of Computer > Windows Update >  Change Settings > Important Updates > Select Check for updates but let me choose whether to download or install them. 


Visit Marks PC Solution read the post.