Sunday, 22 July 2012

Submit Your Website or Blog in Search Engines for Free

undefined

Web developer or blogger already know that it is not a very easy task to drive traffic from search engines. It takes huge time to perform SEO activities for a site. Forum posting, article writing, social connection, back linking, keyword selection and so many tasks need to be performed for SEO. 

But the most important task is to submit your site in the search engines. The most popular search engines are Google, Yahoo, Bing etc. Besides there are thousands of small search engines available in the web. 

But the submission is a very time consuming task. Specially when you need to submit your site to the search engines one by one. And this is very critical too. For your convenience there are also some sites that make your task easy. All you need to do is just submit your website or blog to those sites and they will automatically submit your site to the search engines. 
  1. Diggza
  2. Free Web Submission
  3. SEO Scores
  4. Add URL Free
  5. Add Me
  6. Submit Express
All of the above sites will submit your web or blog to the search engines for free. The procedure differ slightly. But the basic procedure is same. 
  • You've to submit your site's URL and your Email ID.
  • Then agree with their terms and conditions.
  • Check your Email and confirm submission if asked.
  • And resubmit your site once in a month. 
Tips: 
  • You don't need to submit your site in all of the above sites. Choose one or two of them that is suitable for you. 
  • Use an alternative Email instead of your primary Email. Because you may receive many unnecessary messages from those sites.
  • Don't submit your sites very often. 
  • Only submit your home page URL (eg. www.fatemayesmen.blogspot.com). 



Monday, 16 July 2012

undefined
Any mobile has its default security code. And a person may need to change the default security code to enhance the data security. But if the password is forgotten then what? 

In that time you will not be able to access your phone. In that time you can only take it to the service center and expend some money. But If you use Nokia then I have a solution. And this post is going to teach you how to break a security code of Nokia Phone using Master code. Follow the steps below: 
  1. Click on this link
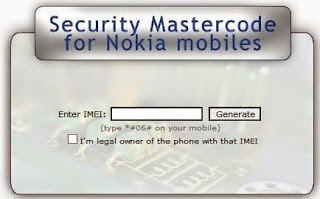
  2. In the landing page you will see a box tell you to enter your IMEI number
  3. To check your IMEI number, you can either type *#06# or look for it on the battery of your phone or find it on the packet of your phone. 
  4. Now type the IMEI number in the given box and check the box showing  I'm legal owner of the phone with that IMEI and hit on the generate button. 
  5. After clicking the generate button you'll be able to see a code below the IMEI number called security master code. You can use this code when your phone wants the password. 

undefined


Visit Marks PC Solution read the post.


Built in PDF Reader in Windows 8 !


PDF or Portable Document Format is a great way to share your documents with your friends or even in online. Earlier I wrote about both PDF Creator and PDF Reader. These third party tools for creating and viewing PDF is also very handy. 

But how do you feel if you don't need to install any PDF Reader/ Viewer on your PC! Windows 8 has built in PDF viewer named Windows Reader. It comes as metro app with Windows 8. And it can also read your XPS documents. 

If you're running Windows 8 and you have no PDF Reader installed on your system then you will see your PDF files look orange color. Actually this is Windows Reader. Just double click to open the file. 

Or press the start button and type reader. Then press enter to open Windows Reader. After opening the reader click on Browse to open your files and folders. And select the PDF file you wanna read. 

When using the reader you may not be able to see any toolbar. Because it is a metro app that runs in full screen. Simply hit the right button of your mouse to see the toolbar. From this bar you can control your reader whether it will show one or two pages. You can also open your files or save the open file and more. Look at the image below:


To close the reader, simply press Alt + F4. Or drag your mouse from top to bottom of the screen. 


Visit Marks PC Solution read the post.


Add a Password on Zipped folder - Windows XP Only


In windows XP, you can protect your files and folders by adding a password. And no software is necessary for this purpose! All you need is just to create a ZIP file and set a password. Let's do it.
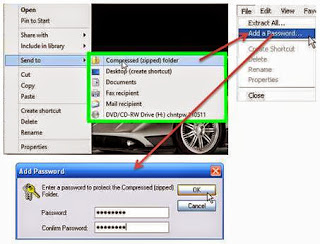
  1. First, select the files and folder that needs to be password protected.
  2. Now right click on it and send it to Compressed (zipped) folder. 
  3. Double click on the zipped folder to open it. 
  4. Now click on the file menu and select Add a password.
  5. Type and confirm the password in the Add Password window and hit OK.
  6. From now, whenever someone tries to open this folder, he will be supposed to enter the password to open the file. 
undefined
Click to enlarge image


And sorry to note this system has been removed from Windows 7 and Windows 8. 


Visit Marks PC Solution read the post.


Tuesday, 10 July 2012

Secret Codes for Nokia !!


Though losing market share gradually, Nokia is still connecting people. Many of us still like Nokia Cell Phones due to its reliability, durability and reasonable price. This post is for the users as well as for the fans of Nokia. 

In this post you'll find some secret codes for your Nokia mobile phone. All codes may not work with all versions of Nokia. And many of these codes will work with most of the models. 

Precaution: Though very much useful, some of these codes may be harmful too! So use these codes with care. Don't take any unnecessary risk while trying them. I'm trying my best to clarify the functions of these codes for your convenience. So before using read the results carefully. 

Type the following codes on the main Screen: 
  • *#06# to see the IMEI number
  • *#7780# to restore factory settings
  • *#67705646# to clear the LCD display (Operator Logo)
  • *#0000# to view software version and date
  • *#746025625# SIM clock allowed status
  • *#62209526# to display the MAC address of the WLAN adapter. This is available only in   the newer devices that supports WLAN like N80
  • #pw+1234567890+1# to show if SIM has any restrictions
  • *#2820# to show bluetooth device address
  • *#7370# to soft format the memory (For Symbian Phones)

Secret Menu: Allows you to view a secret menu about your phone
Type *#92702689# to activate secret menu. It includes the following information:

  1. Serial Number
  2. Manufacturing Date
  3. The Date of Purchase (If it was set)  
  4. Date of last Repair (If found)  
  5. Life Timer

Use the following code with care: 
  • *#3370# - Enhanced Full Rate Codec (EFR) activation. Increase signal strength, better signal reception. It also help if u want to use GPRS and the service is not responding or too slow. Phone battery will drain faster though
  •  *#3370* - (EFR) deactivation. Phone will automatically restart. Increase battery life by 30% because phone receives less signal from network
  •  *#4720# - Half Rate Codec activation
  •  *#4720* - Half Rate Codec deactivation. The phone will automatically restart

If you forgot wallet code for Nokia S60 phone, use this code to reset it.*#7370925538#.
Remember, your  wallet data will be removed. You may be asked to enter the lock code. Default lock code is: 12345


Press *#3925538# to delete the contents and code of wallet.

Unlock service provider: Insert sim, turn phone on and press vol up (arrow keys) for 3 seconds, should say pin code. Press C,then press * message should flash, press * again and 04*pin*pin*pin#

Type *#7328748263373738# to resets security code. Default security code is 12345


Visit Marks PC Solution read the post.


How to Make Windows 7 Genuine - Simple & Easy Way


More than 50% computers are running on Windows 7 OS! This is the market leader now. However the Microsoft is going to launch Windows 8 Final Version at the end of the October, 2012

If you're a victim of software piracy and use illegal version of Windows 7 then you may get continuous error message from desktop. And every time when you open your PC a message will tell you to buy a genuine version of windows. Actually this message is very annoying. 

Sometimes you may need to make your OS genuine to install Microsoft Security Essentials. 

In my previous post I wrote about the easiest way to make Windows XP genuine. And in this post I am showing the way to make Windows 7 Genuine! Let's find out how.
  1. Download the Zipped file from here
  2. Now extract the file.
  3. Now double click on Windows 7 Loader.
  4. Then click on install button and restart your PC when asked.
  5. And if you're looking for Advanced Settings then select the Advanced options located at the bottom left corner of the window.

Tips: In Windows Vista, 7 or 8 don't set your Windows Update Setting automatic. It will consume your internet data and not give you a better result actually. To change automatic update go to Properties of Computer > Windows Update >  Change Settings > Important Updates > Select Check for updates but let me choose whether to download or install them. 


Visit Marks PC Solution read the post.

How to Make Your XP Genuine- Just by Double Click!!


It's 2012! That means 10 years have been passed since Microsoft released Windows XP for the first time. Though this OS is obsolete still nearly 50% users use XP in their Computers. 

Sometimes you may have trouble to make your XP genuine. If your XP detected as invalid once  then you are in a deep trouble. You've to install it again. Besides while installing Microsoft Security Essential your OS must be genuine. In that case your Windows XP will show continuous error message about software piracy. 

So, in this post you'll get the easiest way to make Windows XP genunine. Follow the steps below.
  1. Download the 1 KB zipped .reg file from here
  2. Double Click on the zipped file to open it.
  3. Now double click again and hit yes > OK.
  4. Now restart your PC and enjoy the genuine Windows XP.
Note: This tips has been tested on Windows XP SP 2. Other service packs were not tested. To check your service pack version, go to properties of My Computer. 


Make Windows 7 Genuine - Simple and Easy Steps


undefined

How to Show Hidden Files & Folders of a Flash Drive Caused by Virus


USB flash drive or Memory Card is a great device for sharing files and folders, audio and video, software etc. But at the same time this type of device is also responsible for spreading virus too! A virus can be easily copied from one PC to another by USB flash drives. 

When a PC has no virus protection or not having enough protection be careful when inserting your flash drive in that PC. Because it can affect the software or program stored on it. And other  files like image, audio or video generally not affected by virus. But they may be hidden permanently. 

So, in this post, I am gonna show how to view the hidden files of a flash drive. Let's find out how.
  1. Open My Computer.
  2. Now click on Folder Options located under tools menu. 
  3. Now hit on View Tab.
  4. Now select the Show hidden files and folders.
  5. Deselect both Hide protected operating files and Hide extensions for known file types.
  6. Now click on Apply > OK.
Note: This system works for all versions of windows. But in windows 7 and 8 you may not find the menu bar. In windows 7 to show menu bar press the Alt key then select the tools menu. And Windows 8 users will find it in Windows Explorer at the top right corner of the screen located under view tab named as Options


Tips: To protect your files from viruses you can simply store the files in .zip format. Because a virus can't enter into the zipped files normally. To do so, first select the files you wanna zip and then click right button of mouse and send to Compressed (zipped) folder


Visit Marks PC Solution read the post.


Save your Files as PDF in Office 2010!


undefined


PDF is one of the most popular method if you wanna share your files. Specially when sharing any report, form or document, PDF is the most reliable and acceptable file format. 

By the way, most of the people use dopdf or other 3rd party software to convert their files into PDF. A procedure of PDF conversion is also posted in this blog. But if you use Microsoft  Office 2010 probably you don't need any other third party software to convert your files into PDF. 

You can convert your files into PDF from the following programs: 

  • Access 2010
  • Excel 2010
  • OneNote 2010
  • PowerPoint 2010
  • Project 2010
  • Publisher 2010
  • Visio 2010
  • Word 2010
To save your files into PDF do the following: 
  1. Open any of the above listed programs (ie. Word, Excel or Access) from Microsoft Office 2010. 
  2. Then hit on the File tab located at the upper left corner of the screen.
  3. Now click on Save as to open Save as box.
  4. Enter the file name in the File Name box.
  5. Now select PDF (*.pdf) from the Save as Type option.


Note: In some cases this system may not produce the desired file quality. If this happens then try this system to convert your files. 


Visit Marks PC Solution read the post.


Tuesday, 3 July 2012

How to Add Google +1 Button on Blogspot Blog


Blogger provides an easy way to insert a Google +1 Button on your blog page. You can add this by following some easy and simple steps. 

Let's do it. 
  1. First you need to make sure that you're using the new style of blogger interface. If you're still using the old interface then change it from Blogger
  2. Now go to the blogger home and hit on layout option. 
  3. Now click on Add a Gadget button. Select a button from where you wanna place the +1 button. I prefer somewhere at the bottom. 
  4. After hitting on Add a Gadget button you'll find a list of gadgets. 
  5. Now hit on  +1 Button.
  6. Here you can customize the button as you like. 
  7. Now save it and refresh your blog page to see the result.

Convert Image into Text Online - No Registration!!

undefined

Many of you may dislike typing. Specially when you got any scanned paper or image file and need to convert into text. But you don't need to type the text. You can simply convert it online just by uploading the file! 

Yes. This service is provided by OnlineOCR.net. It's totally free of cost. And there is no need to register. And it supports about 32 languages including English. 

Follow the steps below to convert your image or PDF: 
  1. First go to this site-  http://www.onlineocr.net/
  2. Now at the bottom of this page you'll find an option named Choose File. Here you can choose your desired image  (JPG, JPEG, BMP, TIFF, GIF) file. 
  3. Now at the right to Choose File another option will be available named Upload. Click on it.
  4. Just below the Choose File you'll see a button named Recognize. When you click on it, the file will be converted into text.
  5. Before hitting on Recognize make sure you've chosen the desired Recognition language and Output format.  
  6. If file is selected and uploaded then you may need to enter the captcha. Enter it and hit on Recognize button.
  7. If you wanna receive the file in .doc format then download the file on your PC. 


Visit Marks PC Solution read the post.


How to Add Page Number on Blogspot

By default your blogspot blog doesn't provide any page numbered navigation system. Instead of it the usual themes provide Newer Post, Home and Older post. But reader of the blog as well as the admin of the blog how difficult it is to navigate in this system. 


In this post I am providing a code that can turn your old navigation system into numbered navigation system.  

It is as easy as adding a gadget. All you need to do is just add a HTML or JavaScript Gadget. Just follow the steps below: 
  1. First go to www.blogger.com
  2. Then go to your blog's layout option.
  3. Now click on Add a Gadget.
  4. Here you'll find a list of gadgets. Scroll down and select HTML/ JavaScript gadget.  
  5. Now copy and paste the following code in the gadget box. 
  6. Now save the gadget and refresh your blog to see the result! 

<style type='text/css'>#blog-pager{padding:10px 0;clear:both;}
.showpageNum a {color:#333333;text-decoration:none;border: 1px solid #CCCCCC;margin:0 3px;padding:3px 7px;background-color:#FFFFFF;}
.showpageNum a:hover, .showpage a:hover, .showpagePoint {color:#333333;border: 1px solid #CCCCCC;padding:3px 7px;background-color:#CCCCCC;margin:0 3px;}
.showpageOf {color:#333;text-decoration:none;padding:3px 7px;margin: 0 3px 0 0;}
</style>
<script style='text/javascript'>
var numshowpage=10;
var postperpage =5;
var upPageWord="Previous";
var downPageWord="Next";
var urlactivepage=location.href;
var home_page="/";
</script>
<script style='text/javascript' src='http://bloggerblogwidgets.googlecode.com/files/way2blogging_bloggerpagenavi.js'></script>

This gadget will create a number system like below:


undefined


Visit Marks PC Solution read the post.

Add Facebook Like Button on your Blog!


Today social sites are very much important for webmasters as well as blogger. Because it has a great contribution on SEO. Social sites can influence the visitors to visit your site. But you may not have enough time to share your blog in social sites as you're busy with increasing your site's contents. 

So, in this post I am giving you a simple code by which you can place a Facebook Like button on your blog page. Follow the steps below: 
  1. First go to www.blogger.com
  2. Then go to your blog's layout option.
  3. Now click on Add a Gadget.
  4. Here you'll find a list of gadgets. Scroll down and select HTML/ JavaScript gadget.  
  5. Now copy and paste the following code in the gadget box. 
  6. Now save the gadget and refresh your blog to see the result! 

<div class='sbutton' id='gb'><script src="http://connect.facebook.net/en_US/all.js#xfbml=1"></script><fb:like layout="box_count" show_faces="false" font=""></fb:like></div>


Now, whenever you or someone else click on this like button it will be directly shared on the associated Facebook profile page. But he should be signed in with his Facebook Account. And you'll also get a comment box when you click on this button. 


Visit Marks PC Solution read the post.